Monday, December 31, 2007
Saturday, November 24, 2007
Ribbon Sampler Ring

To make this sampler, you cut equal lengths of ribbon. Then you punch 3/4" squares of black cardstock. Each piece of ribbon was folded over at the top and then sandwiched between two pieces of cardstock before being secured with an eyelet. I would never have done this project this way if it weren't for the new Crop a Dile. It was so easy to punch through all the layers of paper and ribbon. And setting the eyelets was a dream--it didn't tax my hands, wrists or patience. I love the tool. This project is a great camp for selling the Crop-a Dile.
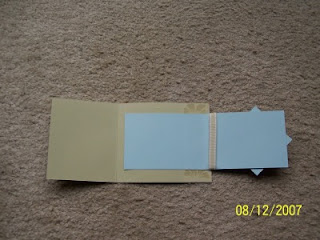
Trifold Card

Step One:For the base card, cut one of the cardstock pieces to 8-1/2" x 4-1"4 Inches.
Step Two:Score this piece at 3-1/2" from the shorter edge.
Step Three:For the mat on the base card flap, cut the second piece of cardstock to 3-1/4" x 4". Adhere to flap.

Step Four:For the top mat on the base card, cut patterned/decorated cardstock to 3-1/8" x 3-7/8" and adhere to flap over the mat from step three.
Step Five:Using the same color cardstock from Step Three, cut the cardstock for the fold-over flap to 8-1/2" x 3".
Step Six:Score this piece in half, at the 4-1/4" mark.
Step Seven:Add adhesive to one side of the flap up to the fold (but not on the fold).
Step Eight:Center this piece on the inside of the base card (up to the fold) so that the fold on the base card faces left, and the fold on the fold-over is on the right. Adhere to base card.
Step Eight:Center this piece on the inside of the base card (up to the fold) so that the fold on the base card faces left, and the fold on the fold-over is on the right. Adhere to base card.
Step Ten:With the lightest color of cardstock, cut a mat for the fold-over flap to 4" x 2-3/4". Adhere to flap.
Step Eleven:Using the same cardstock as in Step Ten, cut a square 2-1/2" x 2"1/2". Decorate as desired, keeping in mind that the orientation of this piece will be diamond shaped.
Step Twelve:Using the same cardstock as Step Five, cut a mat for the square to 2-5/8" x 2-5/8". Adhere decorated piece to this mat.
Step Thirteen:Adhere this piece to the top flap by turning to a diamond orientation and keeping the left corner aligned with the fold on the base card.
Step Fourteen:Stamp the greeting next to the diamond on the top flap.
Step Fifteen:Attach a ribbon to the top flap.
This was one of the funnest cards I've made in a long time. I did it for one of my convention swaps. It's called the Tri-Fold card. Or better know as Flip & Fold. With River Rock & Soft Sky card stock it's just beautiful. I actually used about 10 sets to make it I think. The double stitched ribbon really sets it off as a co-ordinating beauty.
Punch Tag Star Burst card
 SUPPLIES: Large SU. tag punchSmall SU. tag punchCircle punch for center Paper snips2-way glue penDimensionalsStamps: Perfect Presentation Paper: Soft Sky, Wintergreen, Glitter white cardstock, white mulberry paper Ink: Sage Shadow, Craft White Accessories: SU Tag punches, cuttlebug Techniques: Tag punch star
Cardstock for frame and DSP, Vellum/Mulberry or other thin paper for inner parts of the starburst.
Embellishments for center of starburst. ( I NORMALLY don't recommend Brand X punches, but Martha Stewart has a great snowflake for this card if you have a lot in your camp & don't want the expense of button embellishments).

Step by Step
Step 1: For a two-tiered star, punch out 16 small tags leaving about 1/4” between each one.
Step 2: Using the large tag punch, go back over the holes made by the small punch. Line up the punch so that you can see an evenly spaced frame around each hole. Punch out 16 frames.
Step 3: Each layer consists of 4 frames. Apply two-way glue evenly over the back of a few frames at a time. Put the sheet of lighter weight paper face-side up and carefully apply your frames in a cross-shaped pattern. Line up the inner diagonal sides of the frame.
Step 4: Follow the same process for attaching the next layer of 4 frames to the base layer. The second layer is attached to fill in the empty areas of the first cross-shaped layer.

Step 5: The points of the star will be visible when the second layer is attached. Use paper snips to trim away the excess.

Step 6: Repeat entire process to make another star, to mount on top of the first one. Use Dimensionals to separate the two stars.
Step 7: Embellish center of star and finish card.
Wednesday, June 06, 2007
Voila Card Cover

Voila Pocket Card
This card makes a great holder for a small gift.
Cuts
Chocolate Chip:
8 ½” x 9”
3 ¼” x 4 ¾”
Certainly Celery:
3 ½” x 5”
3” x 1 ¼”
Very Vanilla:
3 1/8” x 4 5/8”
2 ¾” x 1”
Grosgrain Ribbon:
3 @ 4”
Gingham Ribbon:
4”
Stamps: Voila- $22.95 (63), Print Pattern-$16.95 (169)
Paper: Chocolate Chip-$6.95 (203), Certainly Celery-$6.95 (204), Very Vanilla - $6.95/40 ( 204)
Ink: Chocolate Chip - $4.95 (201)
Other: Five-in-One Card Cover Template - $9.95 (205), Stampin’ Write Markers- $2.95 ea. (202), Celery Grosgrain - $5.95/25 yds. (234), Caramel Gingham- $6.95/15 yds. (234) , Ticket Corner Punch- $5.95 (220) , Vintage Brads - $7.95/200 (231), Round Paper Clips (Michaels), Stampin’ Sponges - $3.50/3 (222)
Subscribe to:
Comments (Atom)
