Monday, December 31, 2007
Saturday, November 24, 2007
Ribbon Sampler Ring

To make this sampler, you cut equal lengths of ribbon. Then you punch 3/4" squares of black cardstock. Each piece of ribbon was folded over at the top and then sandwiched between two pieces of cardstock before being secured with an eyelet. I would never have done this project this way if it weren't for the new Crop a Dile. It was so easy to punch through all the layers of paper and ribbon. And setting the eyelets was a dream--it didn't tax my hands, wrists or patience. I love the tool. This project is a great camp for selling the Crop-a Dile.
Trifold Card

Step One:For the base card, cut one of the cardstock pieces to 8-1/2" x 4-1"4 Inches.
Step Two:Score this piece at 3-1/2" from the shorter edge.
Step Three:For the mat on the base card flap, cut the second piece of cardstock to 3-1/4" x 4". Adhere to flap.

Step Four:For the top mat on the base card, cut patterned/decorated cardstock to 3-1/8" x 3-7/8" and adhere to flap over the mat from step three.
Step Five:Using the same color cardstock from Step Three, cut the cardstock for the fold-over flap to 8-1/2" x 3".
Step Six:Score this piece in half, at the 4-1/4" mark.
Step Seven:Add adhesive to one side of the flap up to the fold (but not on the fold).
Step Eight:Center this piece on the inside of the base card (up to the fold) so that the fold on the base card faces left, and the fold on the fold-over is on the right. Adhere to base card.
Step Eight:Center this piece on the inside of the base card (up to the fold) so that the fold on the base card faces left, and the fold on the fold-over is on the right. Adhere to base card.

Step Nine:Fold flap over
Step Ten:With the lightest color of cardstock, cut a mat for the fold-over flap to 4" x 2-3/4". Adhere to flap.
Step Eleven:Using the same cardstock as in Step Ten, cut a square 2-1/2" x 2"1/2". Decorate as desired, keeping in mind that the orientation of this piece will be diamond shaped.
Step Twelve:Using the same cardstock as Step Five, cut a mat for the square to 2-5/8" x 2-5/8". Adhere decorated piece to this mat.
Step Thirteen:Adhere this piece to the top flap by turning to a diamond orientation and keeping the left corner aligned with the fold on the base card.
Step Fourteen:Stamp the greeting next to the diamond on the top flap.
Step Fifteen:Attach a ribbon to the top flap.
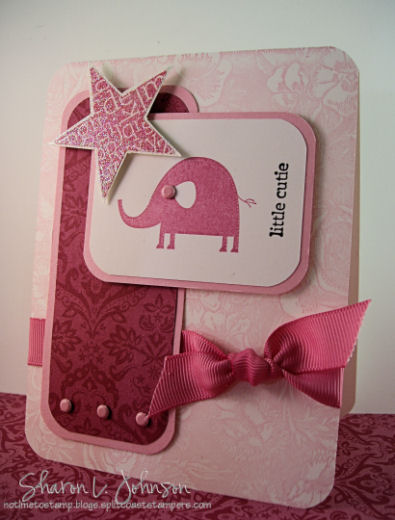
This was one of the funnest cards I've made in a long time. I did it for one of my convention swaps. It's called the Tri-Fold card. Or better know as Flip & Fold. With River Rock & Soft Sky card stock it's just beautiful. I actually used about 10 sets to make it I think. The double stitched ribbon really sets it off as a co-ordinating beauty.
Punch Tag Star Burst card
 SUPPLIES: Large SU. tag punchSmall SU. tag punchCircle punch for center Paper snips2-way glue penDimensionalsStamps: Perfect Presentation Paper: Soft Sky, Wintergreen, Glitter white cardstock, white mulberry paper Ink: Sage Shadow, Craft White Accessories: SU Tag punches, cuttlebug Techniques: Tag punch star
Cardstock for frame and DSP, Vellum/Mulberry or other thin paper for inner parts of the starburst.
Embellishments for center of starburst. ( I NORMALLY don't recommend Brand X punches, but Martha Stewart has a great snowflake for this card if you have a lot in your camp & don't want the expense of button embellishments).

Step by Step
Step 1: For a two-tiered star, punch out 16 small tags leaving about 1/4” between each one.
Step 2: Using the large tag punch, go back over the holes made by the small punch. Line up the punch so that you can see an evenly spaced frame around each hole. Punch out 16 frames.
Step 3: Each layer consists of 4 frames. Apply two-way glue evenly over the back of a few frames at a time. Put the sheet of lighter weight paper face-side up and carefully apply your frames in a cross-shaped pattern. Line up the inner diagonal sides of the frame.
Step 4: Follow the same process for attaching the next layer of 4 frames to the base layer. The second layer is attached to fill in the empty areas of the first cross-shaped layer.

Step 5: The points of the star will be visible when the second layer is attached. Use paper snips to trim away the excess.

Step 6: Repeat entire process to make another star, to mount on top of the first one. Use Dimensionals to separate the two stars.
Step 7: Embellish center of star and finish card.
Wednesday, June 06, 2007
Voila Card Cover

Voila Pocket Card
This card makes a great holder for a small gift.
Cuts
Chocolate Chip:
8 ½” x 9”
3 ¼” x 4 ¾”
Certainly Celery:
3 ½” x 5”
3” x 1 ¼”
Very Vanilla:
3 1/8” x 4 5/8”
2 ¾” x 1”
Grosgrain Ribbon:
3 @ 4”
Gingham Ribbon:
4”
Stamps: Voila- $22.95 (63), Print Pattern-$16.95 (169)
Paper: Chocolate Chip-$6.95 (203), Certainly Celery-$6.95 (204), Very Vanilla - $6.95/40 ( 204)
Ink: Chocolate Chip - $4.95 (201)
Other: Five-in-One Card Cover Template - $9.95 (205), Stampin’ Write Markers- $2.95 ea. (202), Celery Grosgrain - $5.95/25 yds. (234), Caramel Gingham- $6.95/15 yds. (234) , Ticket Corner Punch- $5.95 (220) , Vintage Brads - $7.95/200 (231), Round Paper Clips (Michaels), Stampin’ Sponges - $3.50/3 (222)
Wednesday, April 26, 2006

Ink Pad Labels
 With the new ink pads, it's hard to see what color it is, so I use a word document that has all the colors in it & print it out on Avery's adhesive paper. Then I punch each of the words with the new word punch and stick them to the ends of the pads. All of the words fit perfectly on each pad. I sometimes give a whole set to a hostess or make it be a door prize.
Here is a picture of what my ink pads look like. When I figure out how to insert my Word document on this site, I will.
Stampin' Up! Color matched values
STAMPIN’ UP!® COLOR-MATCH VALUES
The following are color-matched values for Stampin’ Up!®’s exclusive colors. This list includes the nine colors retired in 2005. You can use these values to color-match scrapbook journaling, to create a custom sentiment inside of a card, or to create a color-coordinated element for a hand-stamped party favor. Remember when printing on vellum that it is best to print in a DARK color, layering your vellum over a lighter color.
When printing on cardstock, you may wish to try different color combinations to achieve either dramatic or subtle effects, just as you would with your stamping.For those who don't know how to do this: Open Microsoft Word. Type desired text in your selected Stampin’ Up!® font & highlight. To change the font color, choose FORMAT from the top menu bar. Select FONT, then FONT COLOR. Select MORE COLORS, then choose CUSTOM. You will find a place to enter R, G, and B "values" for the color mixing. Print your text on your printer and compare to your cardstock ring to ensure they match.
SOFT SUBTLESAlmost Amethyst: R-189 G-189 B-255 OR H-170 S-255 L-222**Apricot Appeal: R-255 G-184 B-73 OR H-26 S-255 L-164Barely Banana: R-248 G-250 B-156 OR H-44 S-230 L-203 **Bashful Blue: R-215 G-235 B-255 OR H-149 S-255 L-235Blush Blossom: R-255 G-226 B-204 OR H-18 S-255 L-230**Certainly Celery: R-125 G-153 B-63 OR H-56 S-106 L-108Lavender Lace: R-215 G-215 B-255 OR H-170 S-255 L-235Mellow Moss: R-111 G-136 B-60 OR H-57 S-100 L-98Pale Plum: R-215 G-173 B-211 OR H-217 S-88 L-194 Perfect Plum: R-125 G-61 B-119 OR H-217 S-88 L-93Pretty In Pink: R-250 G-181 B-201 OR H-243 S-223 L-216 Sage Shadow: R-147 G-187 B-115 OR H-66 S-88 L-151
BOLD BRIGHTSBrilliant Blue: R-46 G-46 B-182 OR H-170 S-152 L-114 Gable Green: R-197 G-254 B-154 OR H-67 S-250 L-204 Glorious Green: R-57 G-155 B-66 OR H-89 S-118 L-106 Green Galore: R-159 G-253 B-89 OR H-67 S-249 L-171 Lovely Lilac: R-170 G-54 B-255 OR H-194 S-255 L-155Only Orange: R-254 G-103 B-0 OR H-17 S-255 L-127Orchid Opulence: R-182 G-109 B-255 OR H-191 S-255 L-182Pink Passion: R-255 G-83 B-169 OR H-234 S-255 L-169 **Pixie Pink: R- 255 G-118 B-194 OR H-232 S-255 L-187Real Red: R-212 G-0 B-0 OR H-0 S-255 L-106Tempting Turquoise: R-113 G-252 B-255 OR H-129 S-255 L-184 YoYo Yellow: R-251 G-229 B-19 OR H-38 S-247 L-135
EARTH ELEMENTSCameo Coral: R-255 G-113 B-143 OR H-246 S-232 L-155Chocolate Chip: R-66 G-28 B-28 OR H-0 S-101 L-47Close To Cocoa: R-147 G-97 B-69 OR H-15 S-92 L-108Creamy Caramel: R-214 G-160 B-88 OR H-24 S-154 L-151Garden Green: R-57 G-125 B-55 OR H-84 S-99 L-90More Mustard: R-216 G-175 B-0 OR H-34 S-255 L-108Not Quite Navy: R-0 G-79 B-118 OR H-142 S-255 L-59Old Olive: R-149 G-146 B-0 OR H-41 S-255 L-75Really Rust: R-199 G-77 B-9 OR H-15 S-233 L-104Ruby Red: R-212 G-29 B-30 OR H-0 S-194 L-121Summer Sun: R-242 G-204 B-16 OR H-35 S-229 L-129**Pumpkin Pie: R-232 G-138 B-0 OR H-25 S-255 L-116
RICH REGALS**Always Artichoke: R-68 G-79 B-55 OR H-62 S-46 L-67Ballet Blue: R-97 G-134 B-205 OR H-156 S-132 L-151 Bordering Blue: R-155 G-155 B-168 OR H-170 S-7 L-158 **Bravo Burgundy: R-100 G-15 B-35 OR H-245 S-188 L-58Brocade Blue: R-135 G-176 B-219 OR H-150 S-137 L-177 **Elegant Eggplant: R-108 G-0 B-77 OR H-255 S-255 L-54**Handsome Hunter: R-15 G-51 B-23 OR H-94 S-139 L-33Night of Navy: R-0 G-0 B-75 OR H-170 S-255 L-38**Regal Rose: R-251 G-129 B-175 OR H-239 S-239 L-190Rose Red: R-255 G-27 B-130 OR H-236 S-255 L-141**So Saffron: R-246 G-210 B-127 OR H-29 S-221 L-187Taken With Teal: R-0 G-156 B-152 OR H-126 S-255 L-78
NEUTRALSGoing Gray: R-150 G-150 B-150 OR H-170 S-0 L-150**Sahara Sand: R-149 G-151 B-121 OR H-46 S-32 L-136Whisper White: R-255 G-255 B-255 OR H-170 S-0 L-255Very Vanilla: R-249 G-248 B-224 OR H-40 S-172 L-237Basic Brown: (using Chocolate Chip) R-66 G-28 B-28 OR H-0 S-101 L-47
RETIRED COLORS*Mint Melody: R-189 G-255 B-189 OR H-85 S-255 L-222*Mauve Mist: R-255 G-194 B-216 OR H-240 S-255 L-255*Bliss Blue: R-177 G-216 B-255 OR H-149 S-255 L-216*Eggplant Envy: R-153 G-0 B-153 OR H-213 S-255 L-77 *Forest Foliage: R-22 G-74 B-56 OR H-112 S-138 L-48 *Baroque Burgundy: R-134 G-0 B-67 OR H-234 S-255 L-67 *Rose Romance: R-250 G-90 B-150 OR H-239 S-240 L-170 *Positively Pink: R-255 G-145 B-177 OR H-243 S-255 L-200 *Marvelous Magenta: R-198 G-0 B-170 OR H-219 S-255 L-99*Retired 06/30/05 --
**New Color Available 07/01/05RGB = Red, Green Blue -- HSL = Hue, Saturation, LuminosityThese colors have been customized for an Epson Stylus CX6600. You may want to tweak some of the values if they're close--remember that each printer, even those of the same make and model, will mix colors slightly differently.
This information was compiled by Kaylyn Butler Conover thanks to the generous sharing of many women on Splitcoaststampers.com. Use by individuals and sharing with other stampers is enthusiastically encouraged.
This information is offered up as public domain: If you have been charged a fee for this document, have been offered this document as a “bonus” for an eBay purchase, or found this among a “packet” for which you paid a fee, you have been scammed. Please contact Stampin’ Up!® at 1-800-STAMPUP or myself to be referred to a legitimate, honest demonstrator in your area.
__________________
3 AM

Here I sit- It's 3:16 in the morning and I'm doing something with a BLOG- what the heck is a Blog anyway?
Subscribe to:
Posts (Atom)
